Chocolate Handling and Tempering
MELTING CHOCOLATE
Recommended methods for melting chocolate:
- Water bath or jacketed kettle (take caution when using, as exposure of water or steam will cause the chocolate to seize and thicken)
- Overnight in a chocolate melter or warming oven set to 130°F
- Microwave on medium power at short intervals (15seconds) with stirring
KEY TEMPERATURES FOR WORKING WITH CHOCOLATE
- Chocolate storage: 60-70°F, <50% relative humidity, well ventilated, free from foreign aromas
- Workspace environment: 65 -75°F
- Moulds: 85-90°F
- Confectionery centers: 70 - 80°F
- If using a cooling tunnel with air flow and multiple cooling zones:
- Initial cooling 65 -75°F
- Main cooling 55 - 60°F
- Exit cooling 65 - 70°F
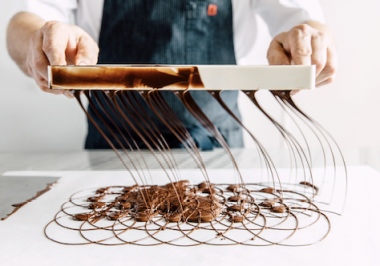
TEMPERING
Tempering is the process of turning melted chocolate into a solid mass of stable cocoa butter crystals with a fine, even-grained texture, accomplished with controlled cooling of the chocolate with agitation, to form many fine-grained beta crystals, as opposed to other crystal forms which are unstable and of random formation. Below are guidelines for two types of tempering methods - Seeding Method and Tabling Method. Please note that the temperatures and methods here are intended to serve as a guide; true temperatures may change pending equipment and room temperatures. Please contact your local Guittard Sales Representative for specific questions and guidance or give us a ring at 1-800-HOT-CHOC.
VIEW OUR GUIDES TO TEMPERING VIA THE LINKS BELOW:
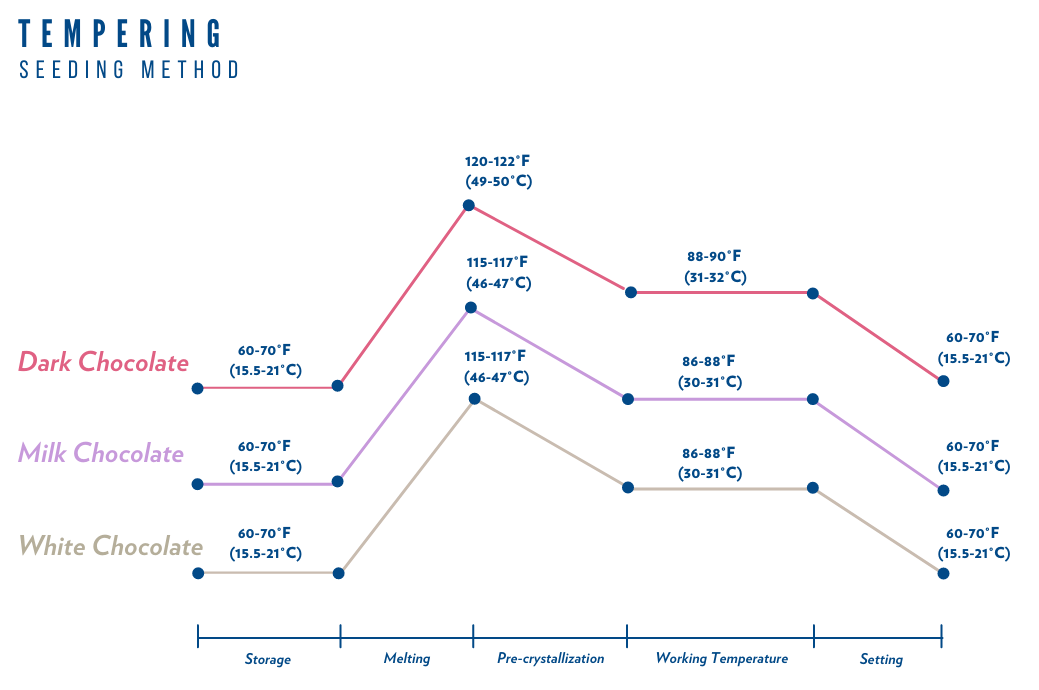
SEEDING METHOD
- Melt dark couverture to 120-122°F (49-50°C) (for milk and white couverture, melt to 115-117°F [46-47°C]). A slow overnight melt is ideal to ensure all particles of cocoa butter have melted.
- Add the seeds in 3 to 4 additions while slowly stirring the melted chocolate. The stirring is crucial to disperse crystals needed to create a stable tempered chocolate.
- Monitor the temperature and the rate at which the seeds are melting. The target temperature for dark chocolate is 88-90°F (31-32°C) (for milk and white couverture, 86-88°F [30-31°C]).
- If small pieces of chocolate remain, continue agitating to create a homogenous mixture. Ensure working temperature is within the correct range to avoid over crystallization, using a heat gun to gently warm if needed.
- Test by dipping the tip of a scraper into the chocolate; the chocolate should begin to set within 2 minutes and have a uniform sheen to it. Milk and white chocolate will take a little longer due to the added milk fat.
VIEW PDF VERSIONS OF THE SEEDING METHOD HERE.
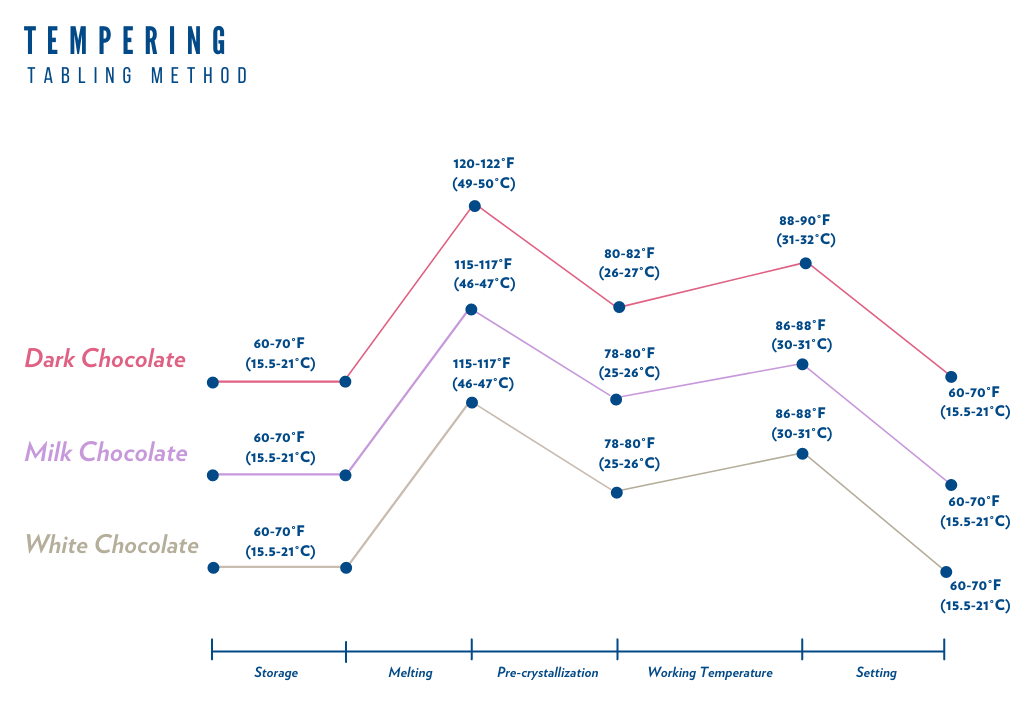
TABLING METHOD
- Melt dark couverture to 120-122°F (49-50°C) (for milk and white couverture, melt to 115-117°F [46-47°C]). Ensure that no solid pieces of chocolate remain.
- Pour 75% of the melted chocolate onto a solid work surface, preferably marble or granite.
- Begin a uniform motion of spreading the chocolate outward with an offset spatula and scraping it back inward onto itself. Repeat this action until the chocolate looks and feels thicker from the crystal development.
- When the mass reaches 82°F (27°C) (for milk and white couverture, 80°F [26°C]), you will notice it becomes thicker. Scrape it from the work surface into the remaining 25% of warmed chocolate.
- Immediately stir together to evenly distribute crystals and ensure final working temperature is 88-90°F (31-32°C) (for milk and white couverture, 86-88°F [30-31°C]). If necessary, use a heat gun to gently warm the chocolate.
- Test by dipping the tip of a scraper into the chocolate; the chocolate should begin to set within 2 minutes and have a uniform sheen to it. Milk and white chocolate take a little longer due to the added milk fat.
VIEW PDF VERSIONS OF THE TABLING METHOD HERE.
HAND DIPPING
Begin with tempered chocolate. Follow the tempering instructions mentioned above.
To maintain the chocolate temper and avoid over-tempered chocolate while dipping, use a deep bowl rather than a shallow bowl.
The piece to be dipped should be at room temperature, below the temperature of the tempered chocolate. If the center is too cold, it can cause the chocolate to set too quickly, giving a thick or uneven layer of chocolate.
Use a clean dipping fork to dip the center into the bowl of tempered chocolate. For a fully coated piece, place the center onto the dipping fork with about 2/3 of the center on the fork and 1/3 overhang beyond the fork. Fully submerge the piece into the chocolate and lift to pull a clean layer of chocolate over the center. Lightly tap the fork on the wall of the bowl to allow excess chocolate to drip off of the confection. Gently use the edge of the bowl to scrape excess chocolate off the bottom of the piece.
Carefully place the dipped piece onto a parchment or plastic-lined tray and pull the dipping fork out from under the piece. Let cool in an area with good air circulation.
If the chocolate layer is coming out too thick, there is a ‘foot’ on the confection, or air bubbles, increase the tapping on the side of the bowl to remove excess chocolate or use a thinner, more fluid chocolate. On the other hand, if the chocolate shell is too thin, consider using a thicker chocolate.
FREEZING CHOCOLATE
Freezing chocolate may be used to extend the shelf life of chocolate and chocolate confections. When freezing chocolate, it is important to avoid condensation, which will result in sugar bloom issues. Be sure that the chocolate is fully cooled before packing, sealing, and freezing. To bring the chocolate back to room temperature, remove the chocolate from the freezer, keeping the packaging fully sealed and intact until the chocolate has reached ambient temperature. This will help avoid condensation. If possible, a low humidity freezer is optimal.
Whether freezing or refrigerating chocolate, be mindful of the other items in the space since chocolate readily picks up other flavors.
WORKING WITH COMPOUND COATINGS
Compound coatings differ from chocolate in their fat composition. Guittard compound coatings are made with non-hydrogenated palm kernel and palm oils in place of cocoa butter, and also contain sugar, dairy ingredients, milk and/or whey. Compound coatings do not require the same tempering process as chocolate. Access the compound coating handling instructions here.
When working with Guittard compound coatings, we suggest the following process. For additional assistance from the experts, please contact us. Guidance on compound coating handling:
- Carefully melt Guittard A’peels or coatings to 120-125°F (48-51°C), while stirring frequently.
- Remove from heat source and stir occasionally until the temperature drops to 105-110°F (40-43°C).
- At this point, the melted A’peels or coatings are ready to use. Continue to maintain this temperature range; carefully heat as needed.
- For best results, immediately shock cool the product in the refrigerator until fully set. Without proper cooling, product may appear dull and spotted.
- Remove from refrigerator and store in a cool environment, 60-70°F (15.5-21°C) with a relative humidity of 50% or less.
- When finished, leftover melted A'peels or coatings may be stored at 105-110°F (40-43°C). Return to 120-125°F (48-51°C) and repeat cooling curve the following day.
* If a cooling tunnel is being used, temperature range for optimal setting is 50-60°F (10-15.5°C)